Introduction to Vera at e-Commons/C3SE
2026-06-04
Aims of this seminar
- Introducing Chalmers e-Commons/C3SE and NAISS
- Our HPC systems and the basic workflow for using them
- various useful tools and methods
- how we can help you
- This presentation is available on C3SE’s web page:
Chalmers e-Commons
- C3SE is part of Chalmers e-Commons managing the HPC resources at Chalmers
- Located in the south section of the Origo building on the 6th floor. Map
- The infrastructure team consists of:
- Vilhelm Verendel (acting director of Chalmers e-Commons)
- Thomas Svedberg
- Mikael Öhman
- Viktor Rehnberg
- Chia-Jung Hsu
- Yunqi Shao
- Dejan Vitlacil
- Leonard Nielsen
- Sahar M. K. Al-Zaidawi
- Hau Yuen Harry Chan
NAISS
- We are part of NAISS, National Academic Infrastructure for Supercomputing in Sweden, a government-funded organisation for academic HPC
- NAISS replaced SNIC starting 2023.
- Funded by NAISS and Chalmers
- 5 other NAISS centres
- Lunarc in Lund
- NSC, National Supercomputing Centre, in Linköping
- PDC, ParallellDatorCentrum, at KTH in Stockholm
- Uppmax in Uppsala
- HPC2N, High Performance Computing Centre North, in Umeå
- Much of the infrastructure is shared between centres. For example, our file backups are saved in Umeå and C3SE runs SUPR.
- Similar software stack is used on other centres: Module system, scheduler, containers.
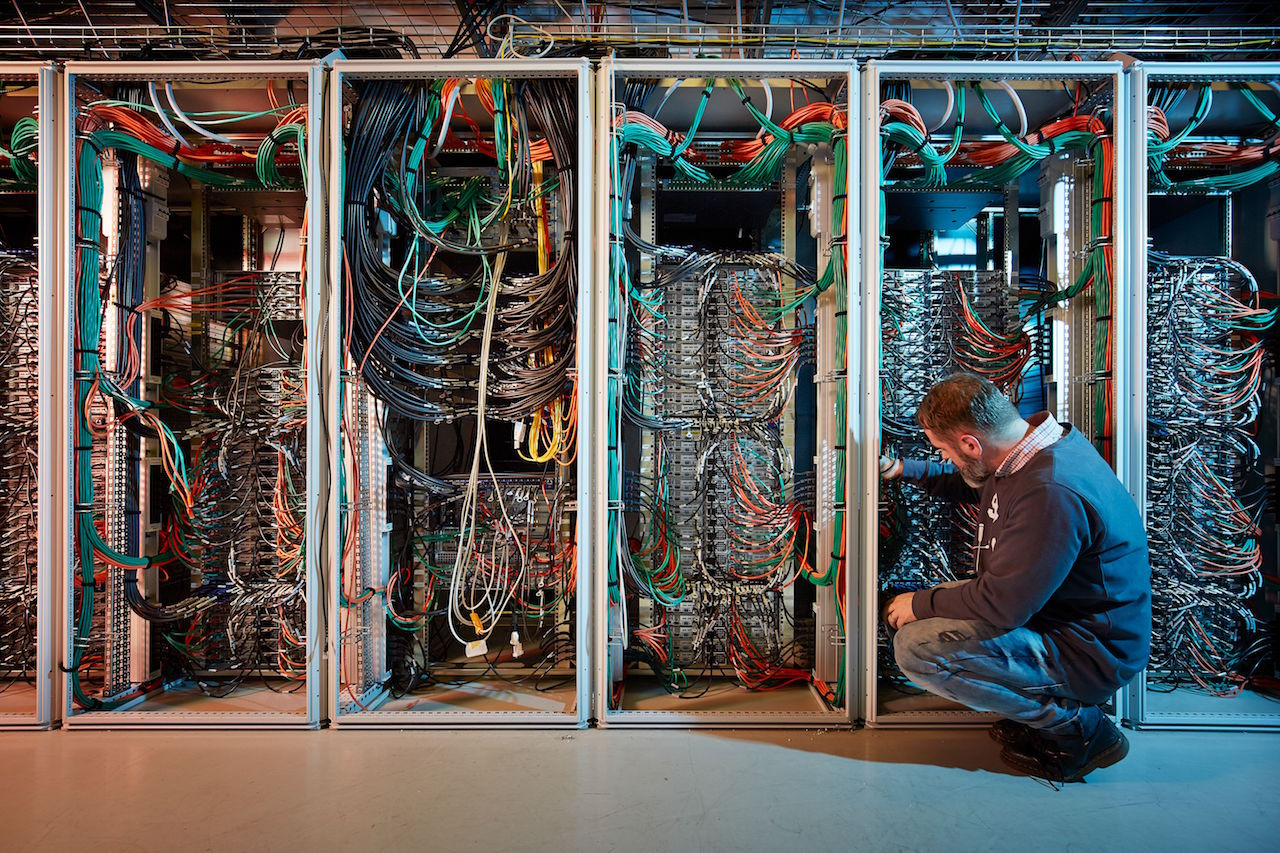
Compute clusters at C3SE
- We primarily run Linux-based compute clusters
- We have two production systems: Vera and Alvis (retiring)
- Upcoming new systems:
- Cirrus (OpenStack-based)
- Disa (Kubernetes-based)
Compute clusters at C3SE
- We run Rocky Linux 8/9, which is a clone of Red Hat Enterprise Linux. Note that:
- Rocky is not Ubuntu!
- Users do NOT have
sudorights! - You can not install software using
apt-get!
Our systems: Vera
- Not part of NAISS, only for C3SE members.
- Vera hardware
- 768 GB RAM per node standard
- Nodes with 512, 768, 1024, 1536, 2048 GB memory also available (some are private)
- 112 AMD EPYC 9354 (“Zen4”) 32 cores @ 3.25 GHz (2 per node)
- +2 nodes with 4 NVidia H100 accelerator cards each.
- 69 Intel(R) Xeon(R) Gold 6338 (“Icelake”) 32 cores @ 2.00GHz (2 per node)
- +4 nodes with 4 Nvidia A40 cards each
- +3 nodes with 4 Nvidia A100 cards each
- Zen4 login nodes are equipped with NVIDIA L40S graphics cards.
- About previous Zen4 expansion, check our news
Vera hardware details
- Main partition has
| #GPUs | GPUs | FP16 TFLOP/s | FP32 | FP64 | Capability |
|---|---|---|---|---|---|
| 16 | A40 | 37.4 | 37.4 | 0.58 | 8.6 |
| 12 | A100 | 77.9 | 19.5 | 9.7 | 8.0 |
| 8 | H100 | 248 | 62 | 30 | 9.0 |
| # nodes | type | ||||
| 96 | Zen4 | ~12 | ~6 | (full 64 cores) | |
| 63 | Icelake | ~8 | ~4 | (full 64 cores) |
- Theoretical numbers!
Our systems: Alvis
- NAISS resource dedicated to AI/ML research
- Alvis is retiring and will be replaced by Arrhenius
Our systems: Cephyr.
- Center storage running CephFS
- Total storage area ~ 7 PiB
- Details: https://www.c3se.chalmers.se/about/Cephyr/
Our systems: Mimer
- Center storage running WekaIO
- Very fast storage for Alvis.
- 634 TB flash storage
- 6860 TB bulk storage shared with Cephyr
- Details: https://www.c3se.chalmers.se/about/Mimer/
Available NAISS resources
- Senior researchers at Swedish universities are eligible to apply for NAISS projects on other centres; they may have more time or specialised hardware that suits you; e.g. GPU, large memory nodes, sensitive data.
- You can find information about NAISS resources on https://supr.naiss.se and https://www.naiss.se
- Contact the support if you are unsure about what you should apply for.
Available local resources
- All Chalmers departments are allocated a chunk of computing time on Vera and storage space on Cephyr
- Each department chooses how they want to manage their allocations
- Not all departments have chosen to request it
For a list of PIs with compute allocations, you can check this list.
Getting access
- https://supr.naiss.se is the platform we use for all resources
- To get access, you must do the following in SUPR:
- Join/apply for a project {:type=1}
- Accept the user agreement {:type=1}
- Send an account request for the resource you wish to use (only available after joining a project) {:type=1}
- Wait ~1 working day (we manually create your account) {:type=1}
- Having a CID is not sufficient.
- We will reactivate CIDs or grant a new CID if you don’t have one.
- There are no cluster-specific passwords; you log in with your normal CID and password (or with a SSH-key if you choose to set one up).
- https://www.c3se.chalmers.se/documentation/first_time_users/
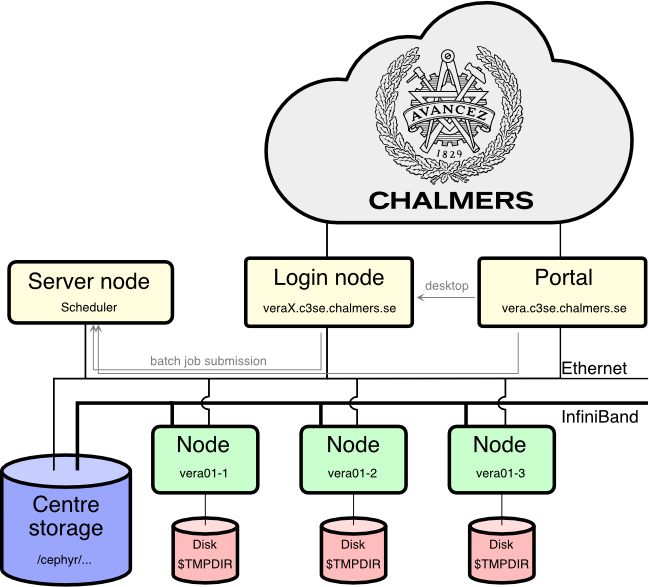
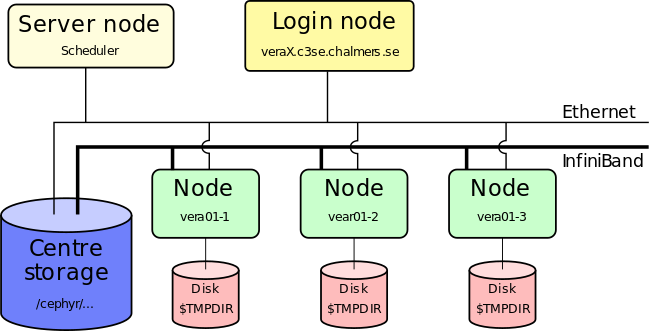
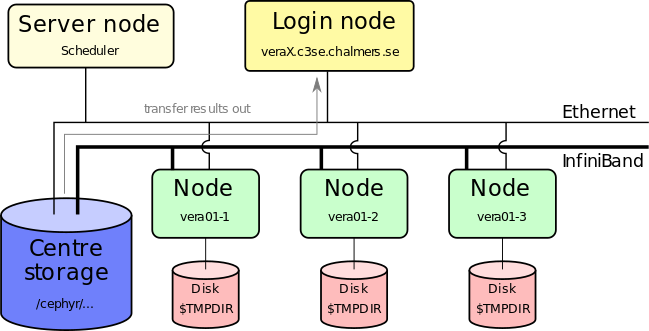
Working on an HPC cluster
- On your workstation, you are the only user - on the cluster, there are many users at the same time
- You access the cluster through a login node - it’s the only machine(s) in the cluster you can access directly
- There’s a queuing system/scheduler which starts and stops jobs and balances demand for resources
- The scheduler will start your script on the compute nodes
- The compute nodes are mostly identical (except for memory and GPUs) and share storage systems and network
Working on an HPC cluster
- Users belong to one or more projects, which have monthly allocations of core-hours (rolling 30-day window)
- Each project has a Principal Investigator (PI) who applies for an allocation
- The PI decides who can use their projects.
- All projects are managed through SUPR
- You need to have a PI and be part of a project to run jobs
- We count the core-hours your jobs use
- The core-hour usage for the past 720 hours influences your job’s priority.
Vera compute cluster
Connecting
- Vera can be accessed in three ways:
- SSH
- Open OnDemand portal
- RDP
- Vera users need to set up Chalmers VPN to connect from outside Chalmers or GU (VPN).
- Access to Chalmers eduVPN will require MFA. (details)
- This applies to all services: SSH, file transfer, Open OnDemand portal
Connecting via SSH
- Use your CID as user name and log in with ssh:
- Vera:
ssh CID@vera1.c3se.chalmers.seorCID@vera2.c3se.chalmers.se(accessible within Chalmers and GU network) - Authenticate yourself with your password or set up aliases and ssh keys (strongly recommended for all)
- On Linux or Mac the ssh client is typically already installed. On windows we recommend WSL or Putty.
- WSL is a good approach if you want to build some Linux experience.
Connecting via Open OnDemand portal
- Open OnDemand portal https://vera.c3se.chalmers.se
- Browse files, check disk and file quota, check project usage in web
Connecting via RDP
- We provide graphical login using RDP on the shared login nodes. See Remote graphics for more info.
- Our in-house-developed web client:
- You can use RDP applications like Devolution (on Windows), Mac OS Windows App, or Linux applications like Remmina or krdc. In that case use
vera1.c3se.chalmers.se:3389orvera2.c3se.chalmers.se:3389. - Desktop clients tend to offer a better experience.
- This is still a shared login node.
Desktop
- Similar environment in OnDemand and RDP.
Launching job
- Simulations must NOT run on the login nodes.
- On compute clusters, jobs must be submitted to a queuing system that starts your jobs on the compute nodes.
- OnDemand apps help your submit jobs. It is easy to request resources but less flexibility.
- Maximum wall time is 7 days (we might extend it manually in rare occasions)
- Anything long running should use checkpointing of some sort to save partial results.
- When you allocate less than a full node, you are assigned a proportional part of the node’s memory and local disk space as well.
Launching job via onDemand
- Launching apps on compute nodes as interactive job, including:
- Desktop
- Jupyter notebooks
- MATLAB proxy
- RStudio
- VSCode
- Chainlit Chatbot
- SD.Next
- Launch apps on log-in nodes
- TensorBoard
- Jobs can be customized by copying the examples under
/apps/portal/to your home dir~/portal/. - See our documentation for details
Jupyter environment
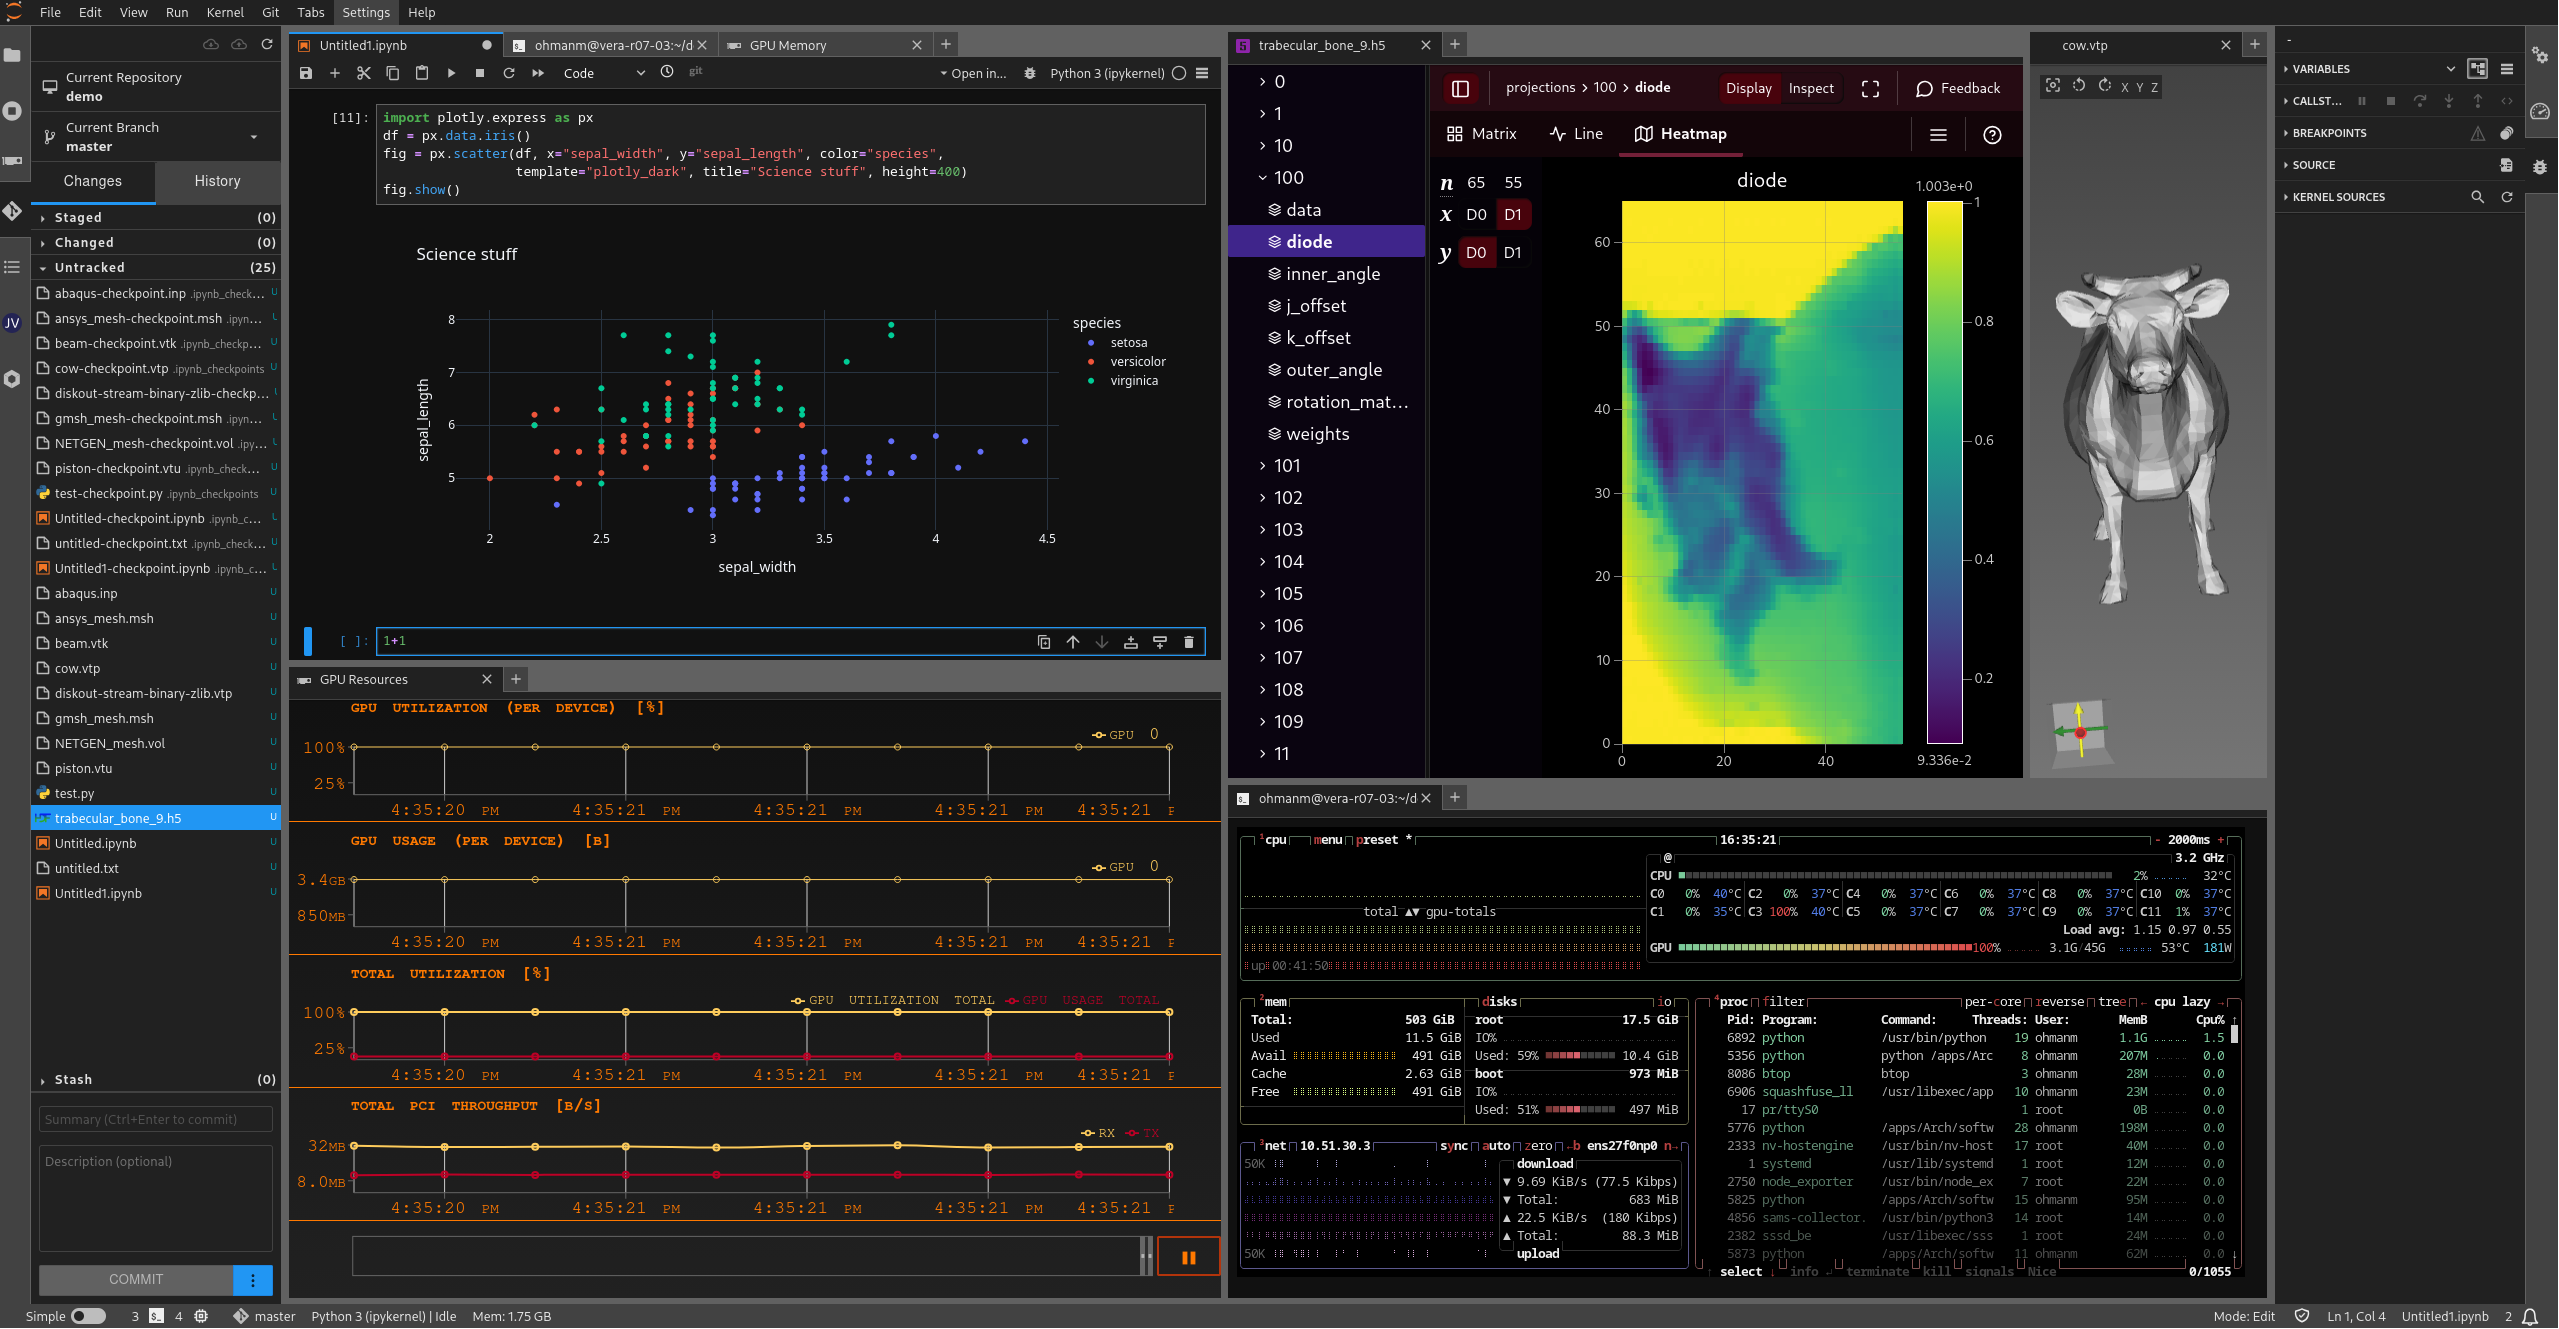
- A JupyterLab environment enriched by available extensions
- More details
Launching job from shell
- Prepare job script and submit it
- You can do job submission via SSH connection or submit a job from a teminal in a desktop session (RDP or OnDemand Login Desktop)
Shell basic
- At the prompt ($), simply type the command (optionally followed by arguments to the command). E.g:
$ ls -l
...a list of files...- The working directory is normally the “current point of focus” for many commands
- A few basic shell commands are
ls, list files in working directorypwd, print current working directory (“where am I”)cd directory_name, change working directorycp src_file dst_file, copy a filerm file, delete a file (there is no undelete!)mv nameA nameB, rename nameA to nameBmkdir dirname, create a directory See alsogrep, find, less, chgrp, chmod
man-pages
- man provides documentation for most of the commands available on the system, e.g.
- man ssh, to show the man-page for the ssh command
- man -k word, to list available man-pages containing word in the title
- man man, to show the man-page for the man command
- To navigate within the man-pages (similar to the less command) space - to scroll down one screen page
b- to scroll up one screen pageq- to quit from the current man page/- search (type in word, enter)n- find next search match (N for reverse)h- to get further help (how to search the man page etc)
Preparing job
- Prepare your jobs on login nodes
- Login nodes are shared resources!
- Install your own software (if needed)
- Transfer input files to the cluster
- Prepare batch scripts for performing your analysis
Submitting job
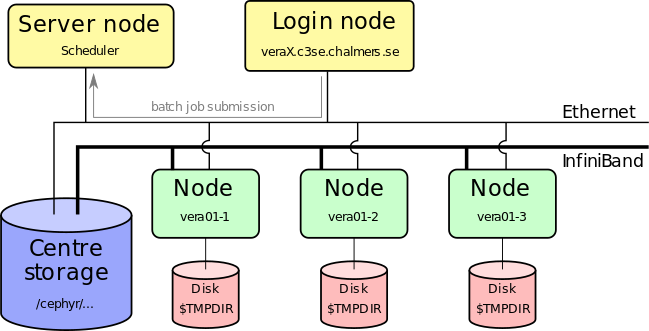
- Submit job script to queuing system (sbatch)
- You’ll have to specify project account, number of cores, wall-time, GPU/large memory
- Job is placed in a queue ordered by priority (influenced by usage, project size, job size)
Submitting jobs
- A job is described by a script (script.sh above) that is passed on to the queuing system by the sbatch command
- Submitted from shell as:
sbatch <arguments> script.sh - Arguments to the queue system can be given in the
script.shas well as on the command line - See https://www.c3se.chalmers.se/documentation/submitting_jobs/
Job script example
#!/bin/bash
#SBATCH -A C3SE2024-11-05
#SBATCH -p vera
#SBATCH -n 8
#SBATCH -t 2-00:00:00

echo "Hello world"- Implicitly assigned to ZEN4 nodes
- 8 cores (totally 64 cores on a ZEN4 node)
- 1/8 of memory and 1/8 of disk space of the assigned node will be allocated
Selecting resources on Vera
- You can explicitly request either node type with
-C ZEN4and-C ICELAKE. - If you don’t specify any constraint, you will be automatically assigned
-C ZEN4. - Icelake nodes have at least 512 GB memory and zen4 nodes have at least 768 GB memory
-C MEM1024requests a 1024GB node - 9 (icelake) total (3 private)-C MEM1536requests a 1536GB node - 2 (zen4) total (1 private)-C MEM2048requests a 2048GB node - 3 (icelake) total (all private)
- GPUs can be requested by
--gpus-per-node, the node type is bound--gpus-per-node=A40:4requests 4 A40 (icelake)--gpus-per-node=A100:2requests 2 A100 (icelake)--gpus-per-node=H100:1requests 1 H100 (zen4)
- Don’t specify constraints (
-C) unless you know you need them.
Job cost on Vera
- On Vera, jobs cost based on the number of physical cores they allocate, plus
| Type | VRAM | Additional cost |
|---|---|---|
| A40 | 48GB | 16 |
| A100 | 40GB | 48 |
| H100 | 96GB | 160 |
- Example: A job using a single A100 (one fourth of icelake node) for 10 hours:
(64/4 + 48) * 10 = 640core hours - Note: 16, 32, and 64 bit floating point performance differ greatly between these specialized GPUs. Pick the one most efficient for your application.
- Additional running cost is based on the price compared to a CPU node.
- You don’t pay any extra for selecting a node with more memory; but you are typically competing for less available hardware.
- GPUs are cheap compared to CPUs in regard to their performance
Job starts
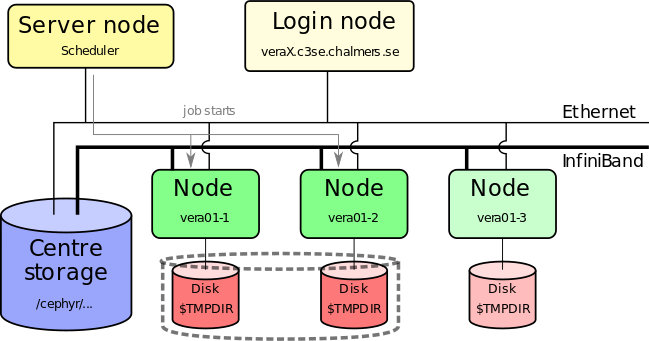
- Job starts when requested nodes are available (and it is your turn)
- Automatic environment variables inform MPI how to run (which can run over Infiniband)
- Performs the actions you detailed in your job script as if you were typing them in yourself
Using TMPDIR in jobs
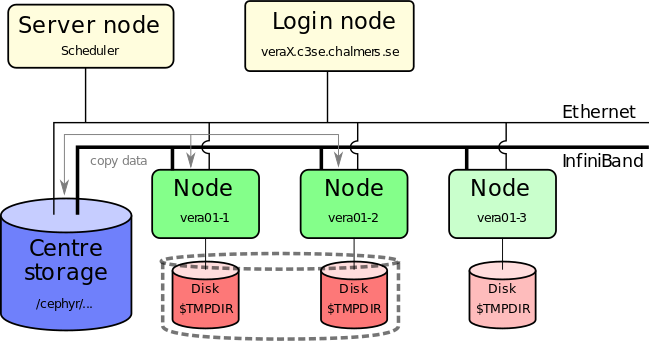
- You must work on TMPDIR if you do a lot of file I/O
- Parallel TMPDIR is available (using
--gres ptmpdir:1) - TMPDIR is cleaned of data immediately when the job ends, fails, crashed or runs out of wall time
- You must copy important results back to your persistent storage
Data read/write and TMPDIR
$SLURM_SUBMIT_DIRis defined in jobs, and points to where you submitted your job.$TMPDIR: local scratch disk on the node(s) of your jobs. Automatically deleted when the job has finished.- When should you use
$TMPDIR?- The only good reason NOT to use
$TMPDIRis if your program only loads data in one read operation, processes it, and writes the output.
- The only good reason NOT to use
- It is crucial that you use
$TMPDIRfor jobs that perform intensive file I/O - If you’re unsure what your program does: investigate it, or use
$TMPDIR! - Using
/cephyr/...or/mimer/...means the network-attached permanent storage is used. - Using
sbatch --gres=ptmpdir:1you get a distributed, parallel$TMPDIRacross all nodes in your job. Always recommended for multi-node jobs that use $TMPDIR.
After the job ends
- You can also do light post-processing directly on our systems
- Graphical pre/post-processing can be done via RDP or the Vera portal.
Interactive job in shell
sruninteractive jobs will be aborted if the login node needs to be rebooted or loss of internet connectivity. Prefer always using the portal.
brings you to a shell on the node:
[ohmanm@vera12-3]#- Maybe useful for quick debug/tests work (but you can also do this in the portal in a better way).
- Not useful when there is a long queue (you still have to wait).
Filesystem and Data Storage
- Home directories:
$HOME = /cephyr/users/<CID>/Vera - The home directory is backed up every night
- Home directories have been migrated to flash storage. New data will be created on flash storage. Old data can be migrated with
cephyr_home_to_flash.py <dir> - We use quota to limit storage use
- Run
C3SE_quotato check your current quota on all your active storage areas in shell - You can also check quota in Open OnDemand portal
- Quota limits (Cephyr):
- User home directory (
/cephyr/users/<CID>/)- 30GB, 60k files
- Use
where-are-my-filesto find file quota on Cephyr. - Use
dustordust -fto check disk space usage and file quota.
- User home directory (
- See also Filesystem
Filesystem and Data Storage
- If you need to store more data, you have options:
- Contact your line manager or department head to join the department allocation.
- Purchase storage: contact thomas.svedberg@chalmers.se for details.
- Try to avoid lots of small files: sqlite or HDF5 are easy to use!
- Data deletion policy for storage projects.
- See NAISS UA for user data deletion.
- We also provide object storage option (Amazon S3 compatible). See Cephyr-S3 for details.
Projects
projinfolists your projects and current usage.projinfo -Dbreaks down usage day-by-day (up to 30 days back).
 Project            Used[h]      Allocated[h]     Queue
    User
-------------------------------------------------------
C3SE2017-1-8       15227.88*            10000      vera
    razanica       10807.00*
    kjellm          2176.64*
    robina          2035.88* <-- star means we are over 100% usage
    dawu             150.59*     which means this project has lowered priority
    framby            40.76*
-------------------------------------------------------
C3SE507-15-6        9035.27             28000       mob
    knutan          5298.46
    robina          3519.03
    kjellm           210.91
    ohmanm             4.84
Viewing available nodes
sinfo -Rlcommand shows how many nodes are down for repair.jobinfo -p veracommand shows the current state of nodes in the main partition
Node type usage on main partition:
TYPE                  ALLOCATED       IDLE    OFFLINE      TOTAL
ICELAKE,MEM1024               1          3          0          4
ICELAKE,MEM512               41         16          0         57
ZEN4,MEM1536                  0          2          0          2
ZEN4,MEM768                   1         97          0         98


Total GPU usage:
TYPE    ALLOCATED IDLE OFFLINE TOTAL
A40             5    7       4    16
A100            8    4       0    12
H100            0    0       8     8
Job command overview
sbatch: submit batch jobssrun: submit interactive jobsjobinfo,squeue: view the job-queue and the state of jobs in queuescontrol show job <jobid>: show details about job, including reasons why it’s pendingsprio: show all your pending jobs and their priorityscancel: cancel a running or pending jobsinfo: show status for the partitions (queues): how many nodes are free, how many are down, busy, etc.sacct: show scheduling information about past jobsprojinfo: shows the projects you belong to, including monthly allocation and usage- For details, refer to the -h flag, man pages, or google.
Job queueing
- Why am I queued?
jobinfo -u $USER:- Priority: Waiting for other queued jobs with a higher priority.
- Resources: Waiting for sufficient resources to be free.
- AssocGrpBillingRunMinutes: We limit how much you can have running at once (<= 100% of 30-day allocation * 0.5^x where x is the number of stars in
projinfo).
- Check
projinfoonce you seeAssocGrpBillingRunMinutes
$ projinfo
---------------------------------------------------------------
C3SE507-15-6 842797.53** 300000 vera- In this example, the project have been used twice more than its allocation (two
*). The maximum hours which can be used simultaneously by all users in this project is 300000 * (0.5)^2 = 75000. - If your job exceeding this size or other users is running jobs, you are queued for
AssocGrpBillingRunMinutes.
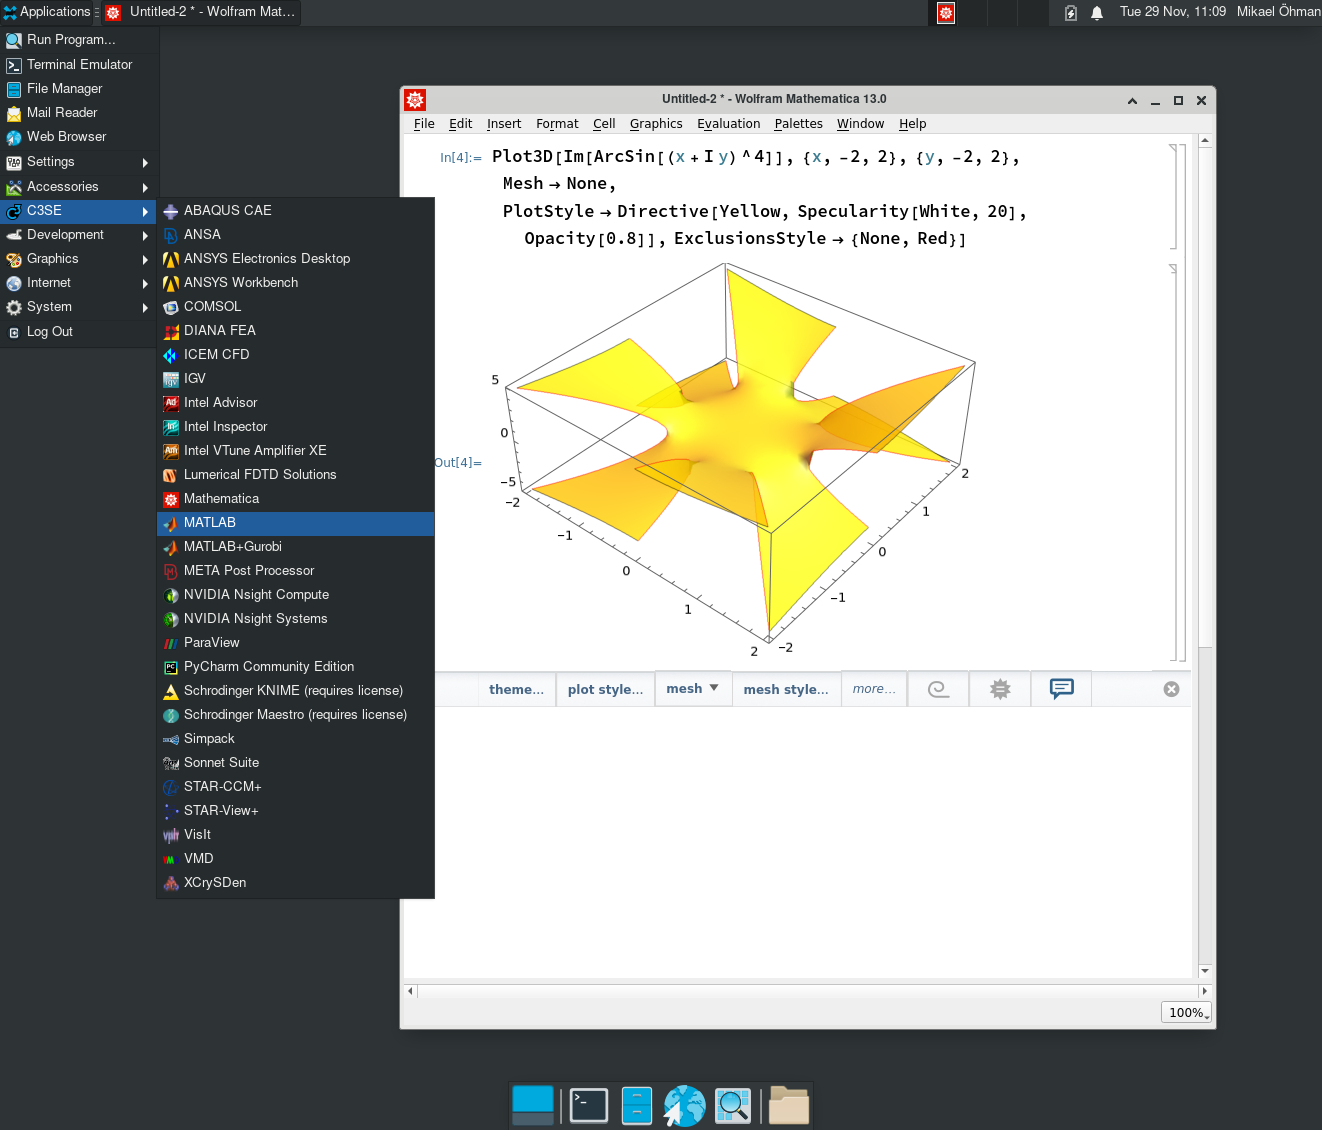
Software - Modules
- Almost all software is available only after loading corresponding modules https://www.c3se.chalmers.se/documentation/module_system/
- To load one or more modules, use the command
module load module-name [module-name ...] - Loading a module expands your current
PATH,LD_LIBRARY_PATH,PYTHONPATHetc. making the software available. - Example:
$ mathematica --version
-bash: mathematica: command not found
$ module load Mathematica/13.0.0
$ mathematica --version
13.0- Don’t load modules in your
~/.bashrc. You will break things like the desktop. Load modules in each jobscript to make them self contained, otherwise it’s impossible for us to offer support.
Software - Modules (continued)
- A lot of software available in modules, including free open-source softwares or commercial softwares.
- Large number of software modules; Python (+a lot of addons such as NumPy, SciPy etc), ANSYS, COMSOL, Gaussian, Gromacs, MATLAB, OpenFoam, R, StarCCM, Mathematica, Schrodinger, CUDA, Nsight Compute, etc.
- module load module-name - load a module
- module list - list currently loaded modules
- module keyword string - search keyword string in modules (e.g. extensions)
- module spider module-name - search for module
- module purge - unloads all current modules
- module show module-name - shows the module content
- module avail - show available modules (for currently loaded toolchain only)
- module unload module-name - unloads a module
Software - Modules (continued)
- Major version update of all software versions is done twice yearly
- Toolchains
- Compilers, C, C++, and FORTRAN compilers such as ifort, gcc, clang
- MPI-implementations, such as Intel-mpi, OpenMPI
- Math Kernel Libraries, optimised BLAS and FFT (and more) e.g. mkl
- Mixing toolchains versions will not work
- Overview of recent toolchains
- It is recommended to pin the version you are using and upgrade when needed
- Popular top level applications may be updated within a single toolchain version.
Software - Python
- We install the fundamental Python packages for HPC, such as NumPy, SciPy, PyTorch, optimised for our systems
- We can also install Python packages if there will be several users.
- We provide
virtualenv,apptainer,conda(least preferable) so you can install your own Python packages locally. https://www.c3se.chalmers.se/documentation/module_system/python/ - Avoid using the old OS installed Python.
- Avoid installing python packages directly into home directory with
pip install --user. They will leak into containers and other environments, and will quickly eat up your quota.
Software - Installing software
- You are ultimately responsible for having the software you need
- You are also responsible for having any required licenses
- We’re happy to help you installing software - ask us if you’re unsure of what compiler or maths library to use, for example.
- We can also install software centrally, if there will be multiple users, or if the software requires special permissions. You must supply us with the installation material (if not openly available).
- If the software already has configurations in EasyBuild then installations can be very quick.
- You can run your own containers.
Software - Building software
- Use modules for build tools things
- buildenv modules, e.g.
buildenv/default-foss-2023a-CUDA-12.1.1provides a build environment with GCC, OpenMPI, OpenBLAS/BLIS, CUDA - many important tools:
CMake,Autotools,git, … - and much more
Python,Perl,Rust, …
- buildenv modules, e.g.
- You can link against libraries from the module tree. Modules set
LIBRARY_PATHand other environment variables and more which can often be automatically picked up by good build systems. - Poor build tools can often be “nudged” to find the libraries with configuration flags like
--with-python=$EBROOTPYTHON - You can only install software in your allocated disk spaces (nice build tools allows you to specify a
--prefix=path_to_local_install)- Many “installation instructions” online falsely suggest you should use
sudoto perform steps. They are wrong.
- Many “installation instructions” online falsely suggest you should use
- Need a common dependency? You can request we install it as another module.
Software - Building software
- Softwares built on Zen4 nodes hardly works on Icelake nodes. You have to build your software separately for Zen4 and Icelake. You can launch interacive jobs on Icelake nodes to build you software
- Some intel toolchains are not installed on Zen4 nodes.
-march=nativeoptimizes your code for the current CPU model.- More information in Building software
Software - Installing binary (pre-compiled) software
- Make sure to use binaries that are compiled optimised for the hardware.
- Vera (Zen4/Icelake) support up to AVX512.
- Difference can be huge. Example: Compared to our optimised NumPy builds, a generic x86 version is up to ~9x slower on Vera.
- Support for hardware like the Infiniband network and GPUDirect can also be critical for performance.
- AVX512 (2015) > AVX2 (2008) > AVX (2011) > SSE (1999-2006) > Generic instructions (<1996).
- Common problem is that software requires a newer glibc version. This is tied to the OS and can’t be upgraded.
- You can use Apptainer (Singularity) container to wrap this for your software.
Software - Building containers
- Simply
apptainer build my.sif my.deffrom a given definition file, e.g:
Bootstrap: docker
From: continuumio/miniconda3:4.12.0

%files
    requirements.txt

%post
/opt/conda/bin/conda install -y --file requirements.txt- You can boostrap much faster from existing containers (even your own) if you want to add things:
Bootstrap: localimage
From: path/to/existing/container.sif

%post
/opt/conda/bin/conda install -y matplotlib- The final image is a small, portable single file.
- More things can be added to the definition file e.g.
%environment
Vera script example
#!/bin/bash
#SBATCH -A C3SE2024-11-05
#SBATCH -p vera
#SBATCH -n 32
#SBATCH -t 2-00:00:00

module purge
module load SciPy-bundle/2024.05-gfbf-2024a
source /cephyr/NOBACKUP/groups/naiss2024-xx-xxx/myenv/bin/activate

python myscript.py --input=input.txt- Outputs (if there is any) and log file (slurm-*.out) are written to the same directory
Vera script example (using icelake CPU)
Vera script example (using GPU)
#!/bin/bash
#SBATCH -A C3SE2024-11-05
#SBATCH -t 2-00:00:00
#SBATCH --gpus-per-node=A40:2

apptainer exec --nv tensorflow-2.1.0.sif python cat_recognizer.py
More on containers
Vera script example
Vera script example (using GPU)
Vera script example (job array)
- Submitted with
sbatch --array=0-99 wind_turbine.sh
#!/bin/bash
#SBATCH -A C3SE2024-11-05
#SBATCH -n 1
#SBATCH -C "ICELAKE|ZEN4"
#SBATCH -t 15:00:00
#SBATCH --mail-user=zapp.brannigan@chalmers.se --mail-type=end

module load MATLAB
cp wind_load_$SLURM_ARRAY_TASK_ID.mat $TMPDIR/wind_load.mat
cp wind_turbine.m $TMPDIR
cd $TMPDIR
RunMatlab.sh -f wind_turbine.m
cp out.mat $SLURM_SUBMIT_DIR/out_$SLURM_ARRAY_TASK_ID.mat- Environment variables like
$SLURM_ARRAY_TASK_IDcan also be accessed from within all programming languages, e.g:
Vera script example (job array)
- Submitted with
sbatch --array=0-50:5 diffusion.sh
#!/bin/bash
#SBATCH -A C3SE2024-11-05
#SBATCH -C ICELAKE
#SBATCH -n 128 -t 2-00:00:00

module load intel/2023a
## Set up new folder, copy the input file there
temperature=$SLURM_ARRAY_TASK_ID
dir=temp_$temperature
mkdir $dir; cd $dir
cp $HOME/base_input.in input.in
## Set the temperature in the input file:
sed -i 's/TEMPERATURE_PLACEHOLDER/$temperature' input.in

mpirun $HOME/software/my_md_tool -f input.in
Here, the array index is used directly as input. If it turns out that 50 degrees was insufficient, then we could do another run:
Vera script example (more slurm environment variables)
Submitted with: sbatch run_oofem.sh
#!/bin/bash
#SBATCH -A C3SE507-15-6 -p mob
#SBATCH --ntasks-per-node=32 -N 3
#SBATCH -J residual_stress
#SBATCH -t 6-00:00:00
#SBATCH --gres=ptmpdir:1

module load PETSc
cp $SLURM_JOB_NAME.in $TMPDIR
cd $TMPDIR
mkdir $SLURM_SUBMIT_DIR/$SLURM_JOB_NAME
while sleep 1h; do
  rsync -a *.vtu $SLURM_SUBMIT_DIR/$SLURM_JOB_NAME
done &
LOOPPID=$!

mpirun $HOME/bin/oofem -p -f "$SLURM_JOB_NAME.in"
kill $LOOPPID
rsync -a *.vtu $SLURM_SUBMIT_DIR/$SLURM_JOBNAME/
Job monitoring
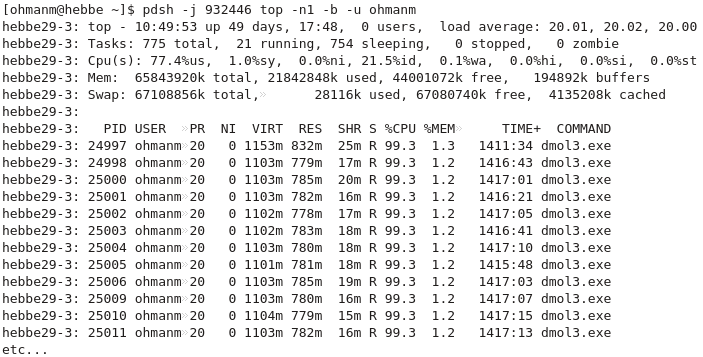
- You can log on to the nodes that your job got allocated by using ssh (from the login node) as long as your job is running. There you can check what your job is doing, using normal Linux commands - ps, top, etc.
- top will show you how much CPU your process is using, how much memory, and more. Tip: press ‘H’ to make top show all threads separately, for multithreaded programs
- iotop can show you how much your processes are reading and writing on disk
- Performance benchmarking with e.g. Nvidia Nsight compute
- Debugging with gdb, Address Sanitizer, or Valgrind
Job monitoring
- Running top on your job’s nodes:
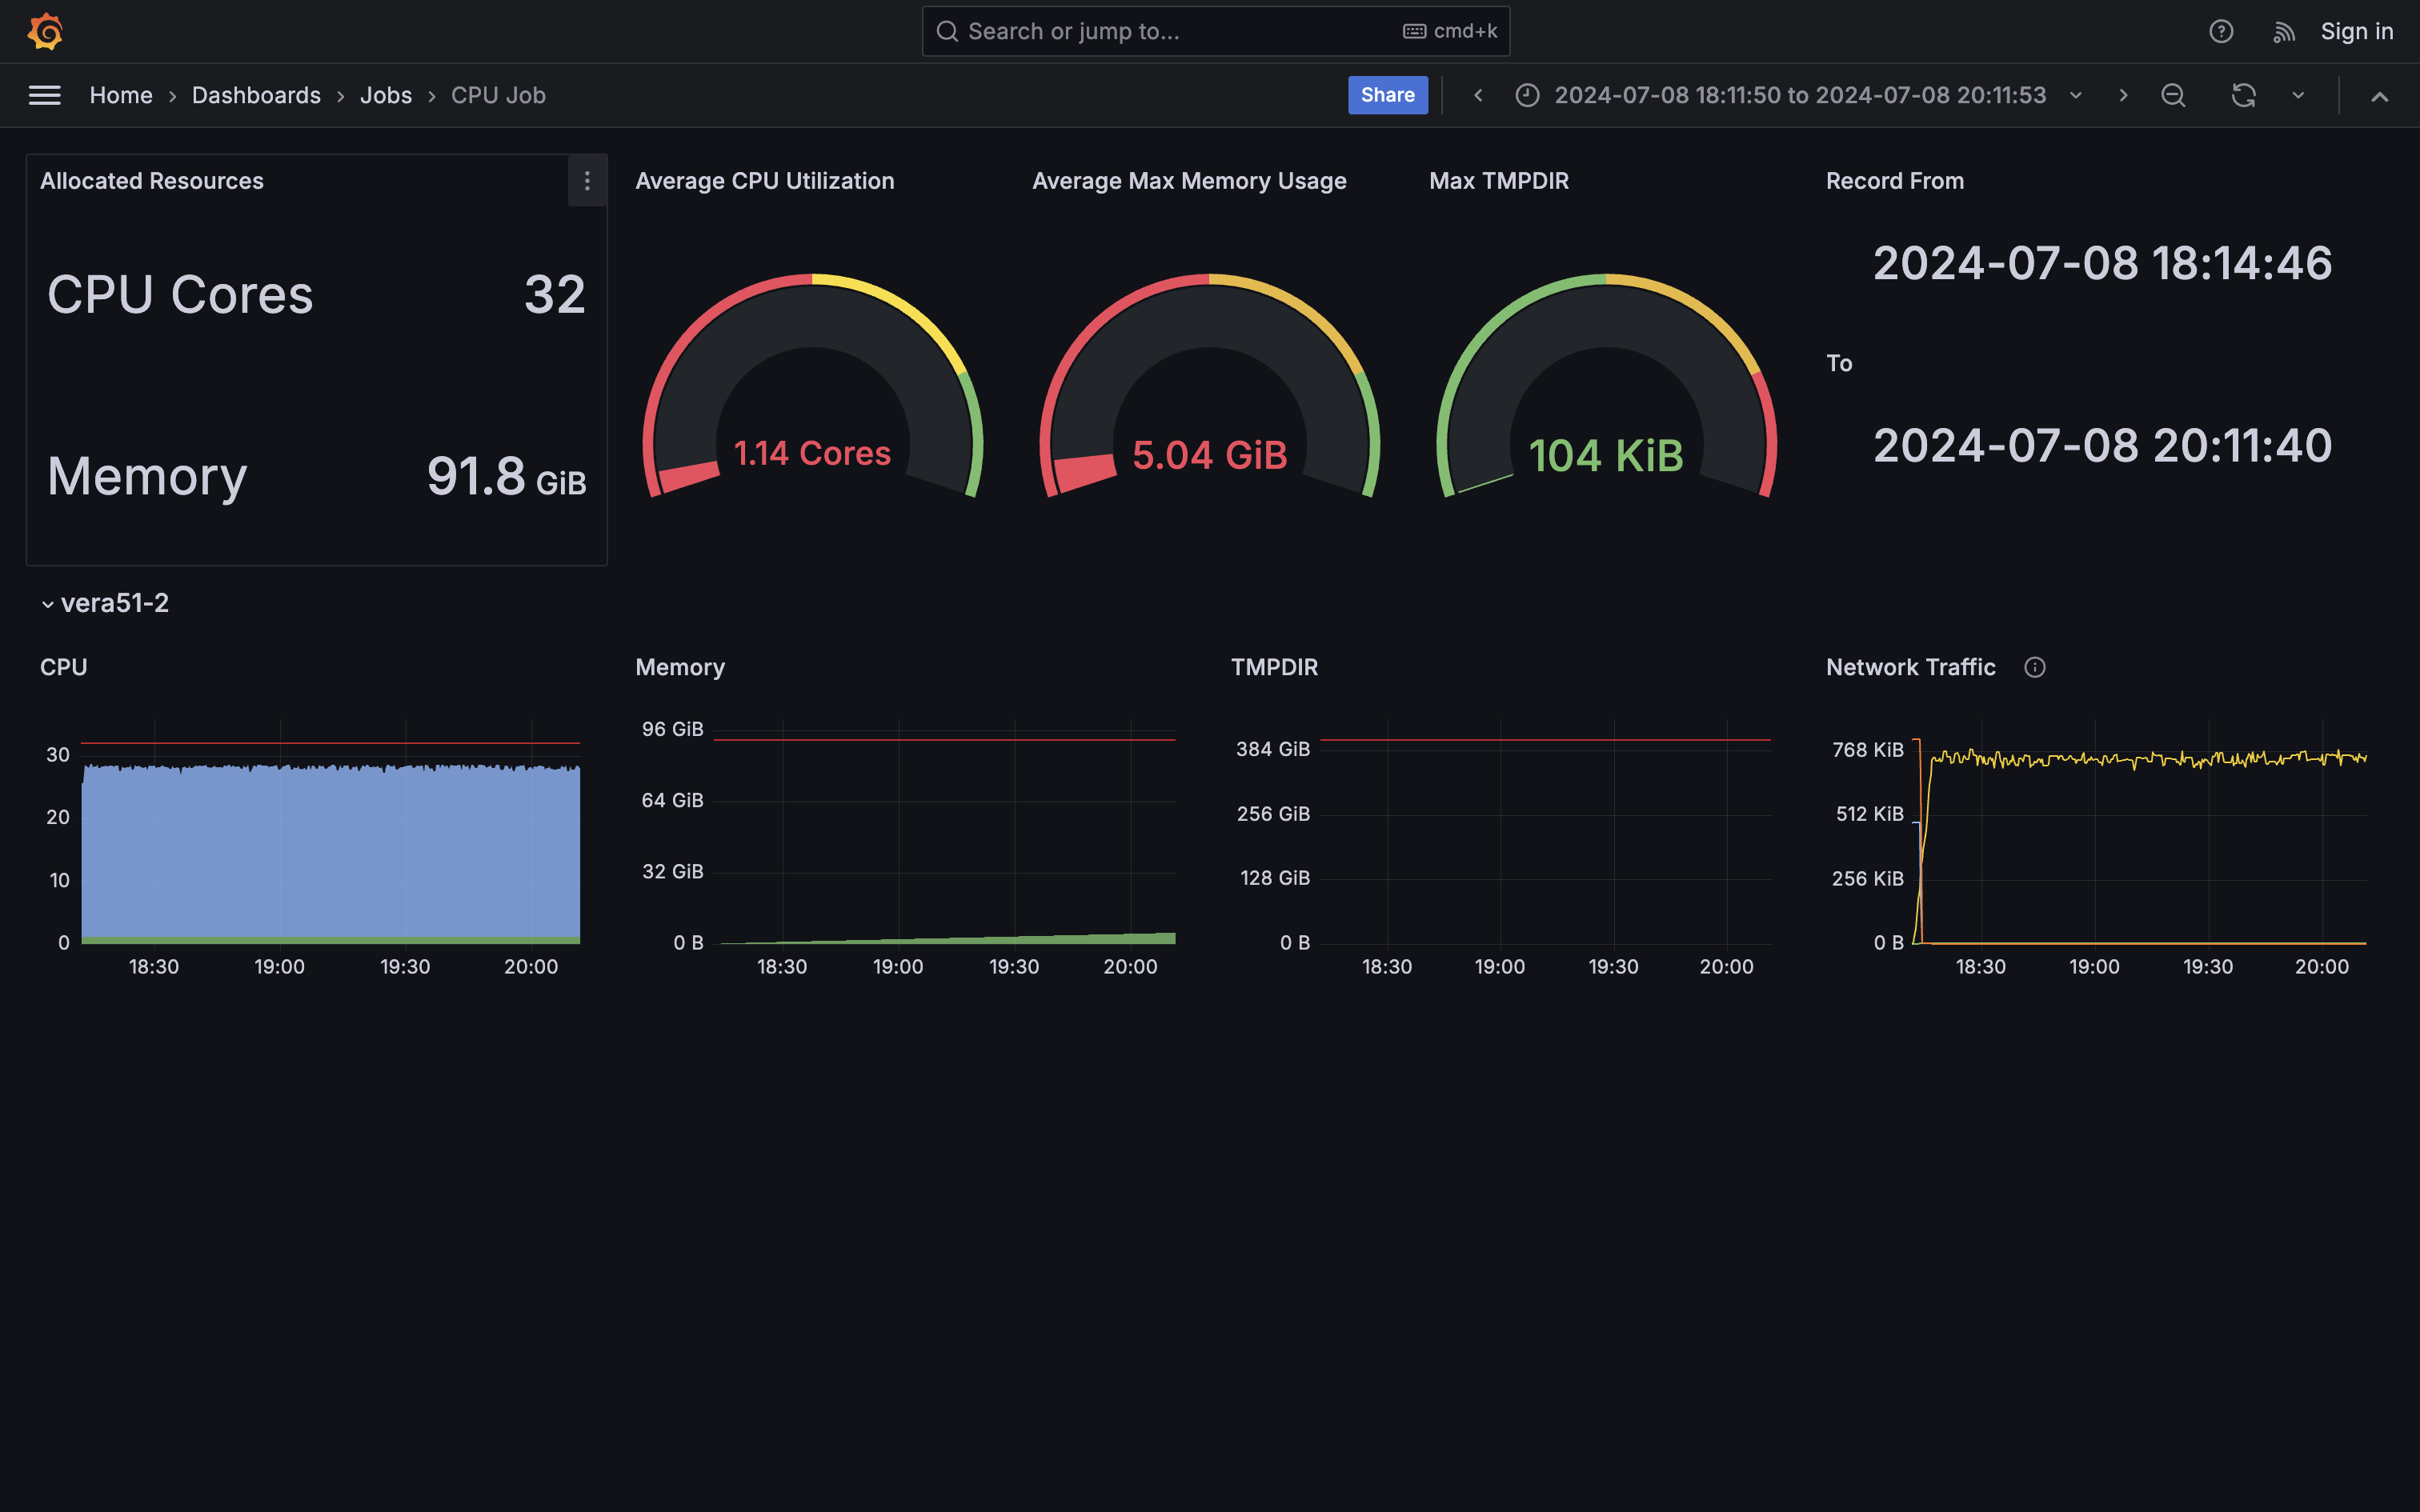
Job monitoring
job_stats.py JOBIDis essential.- Check e.g. memory usage, user, system, and wait CPU utilisation, disk usage, etc
Job monitoring
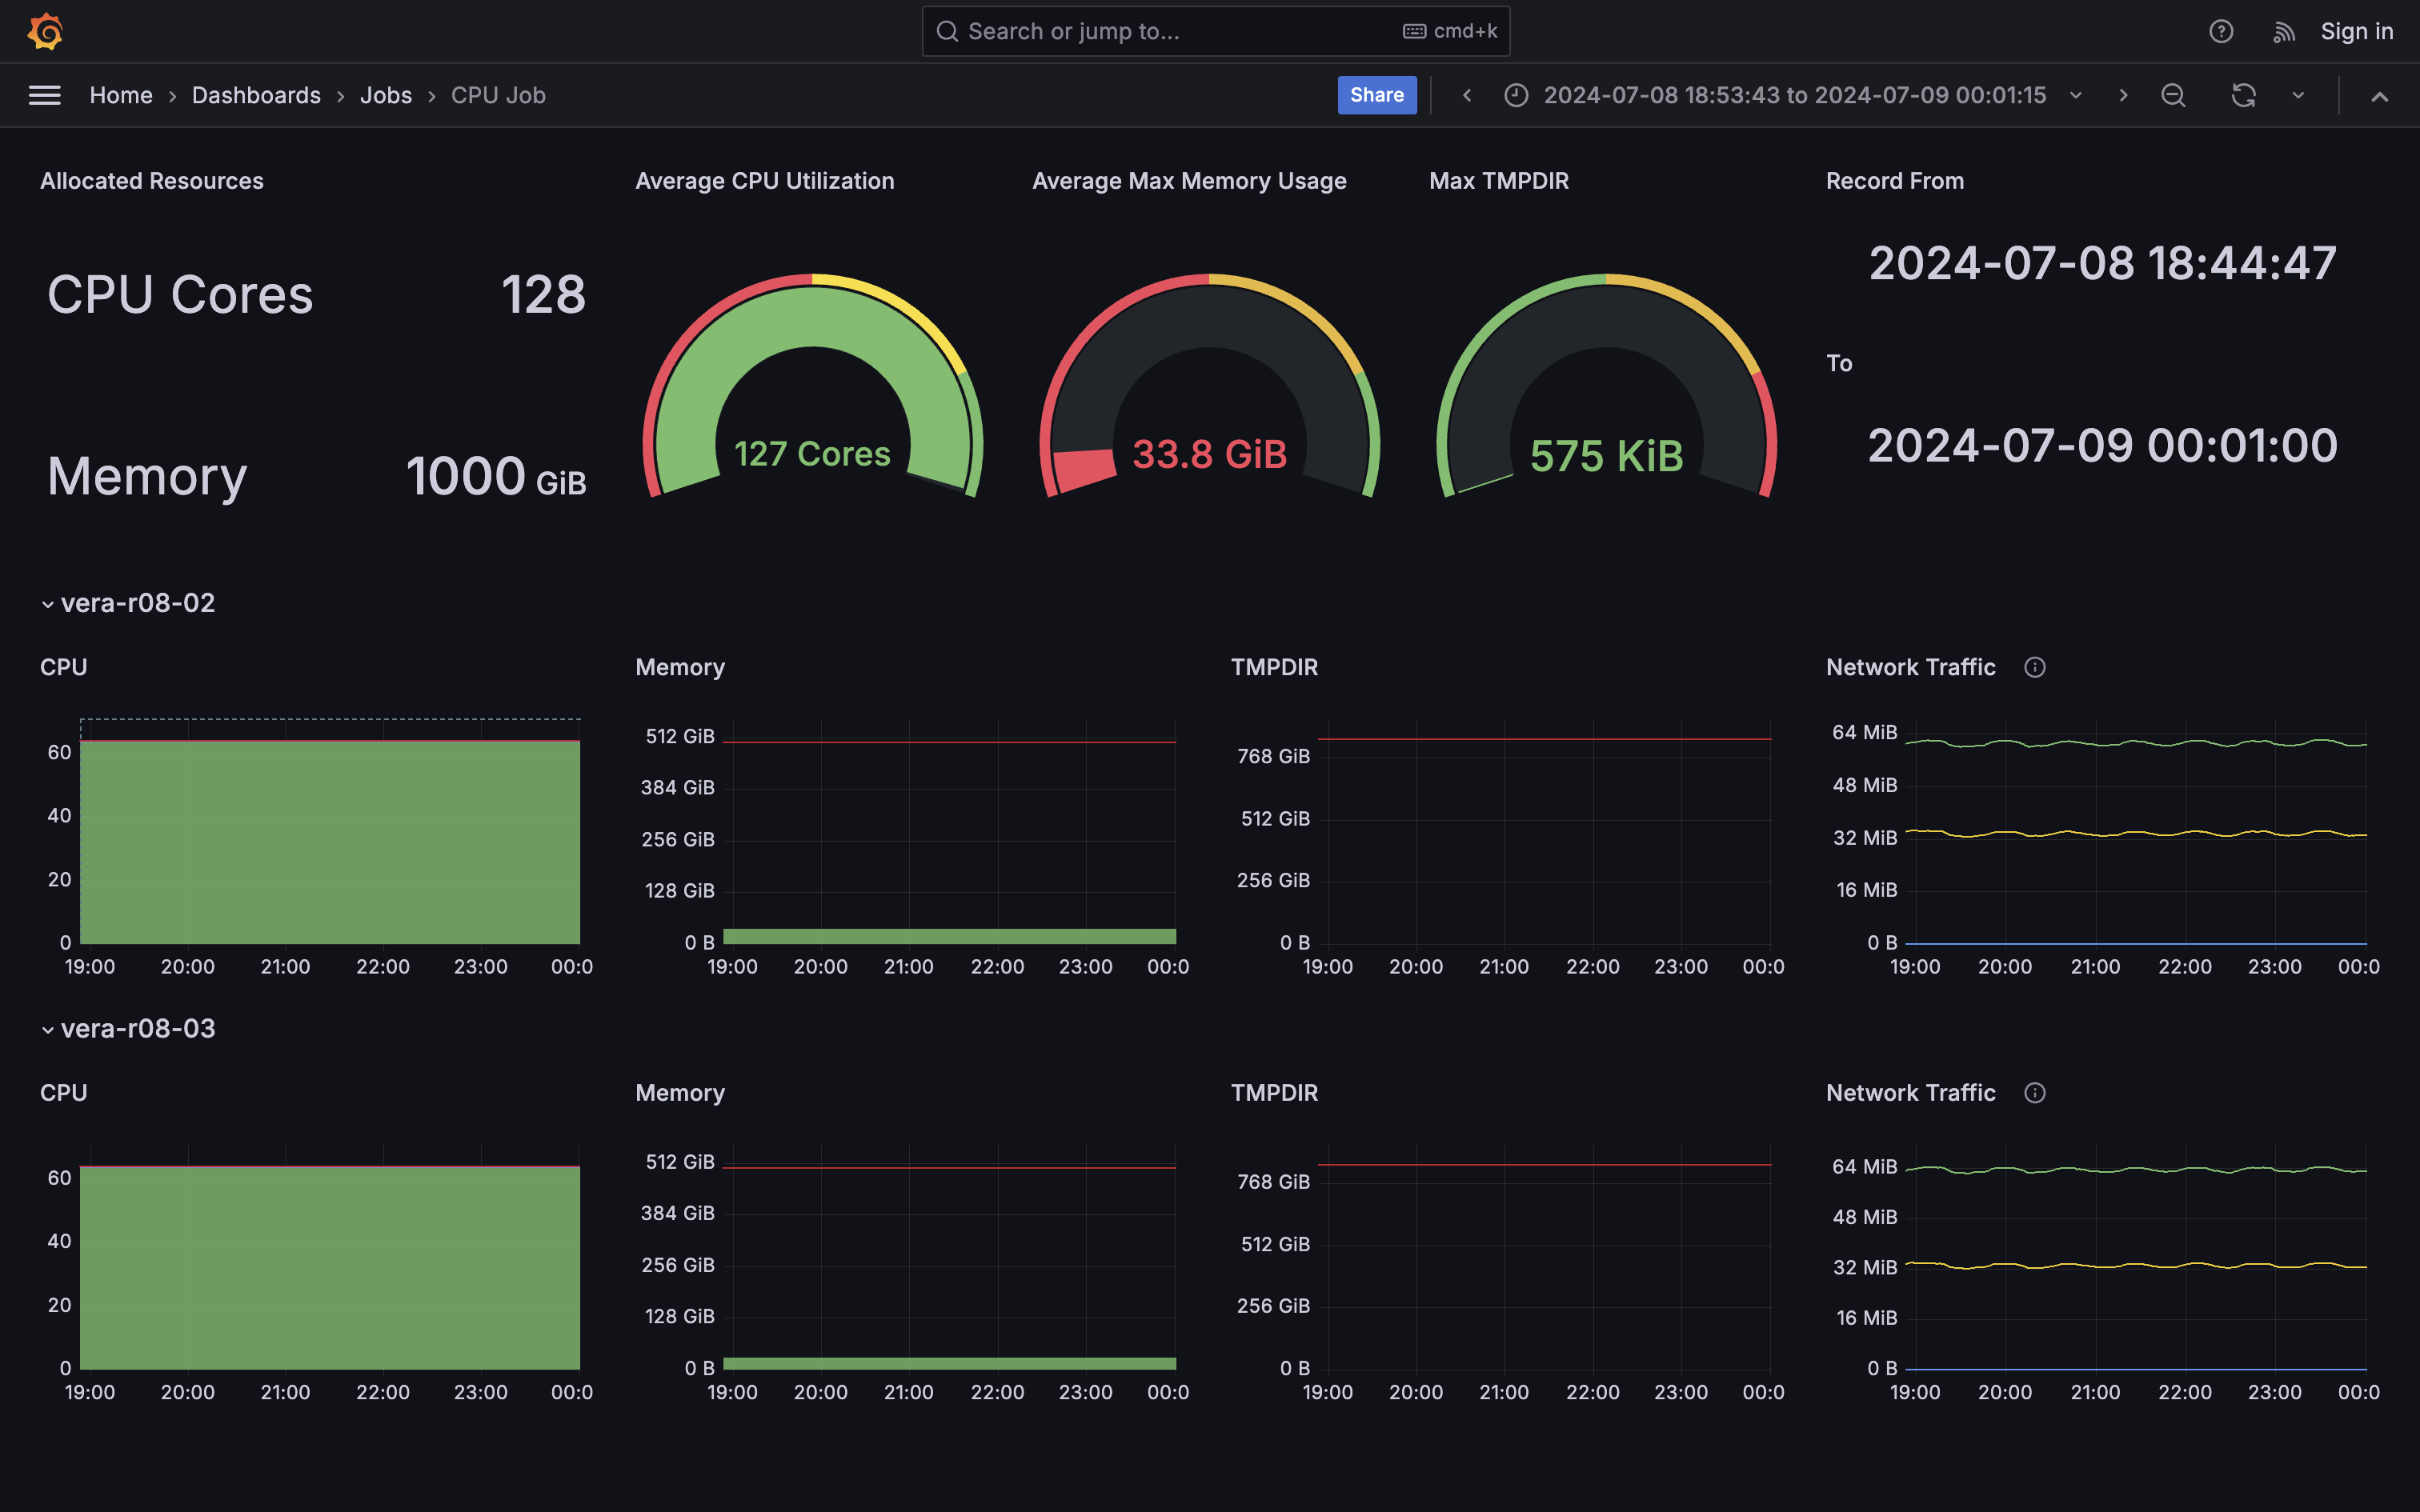
- The ideal job, high CPU utilisation and no disk I/O
Job monitoring
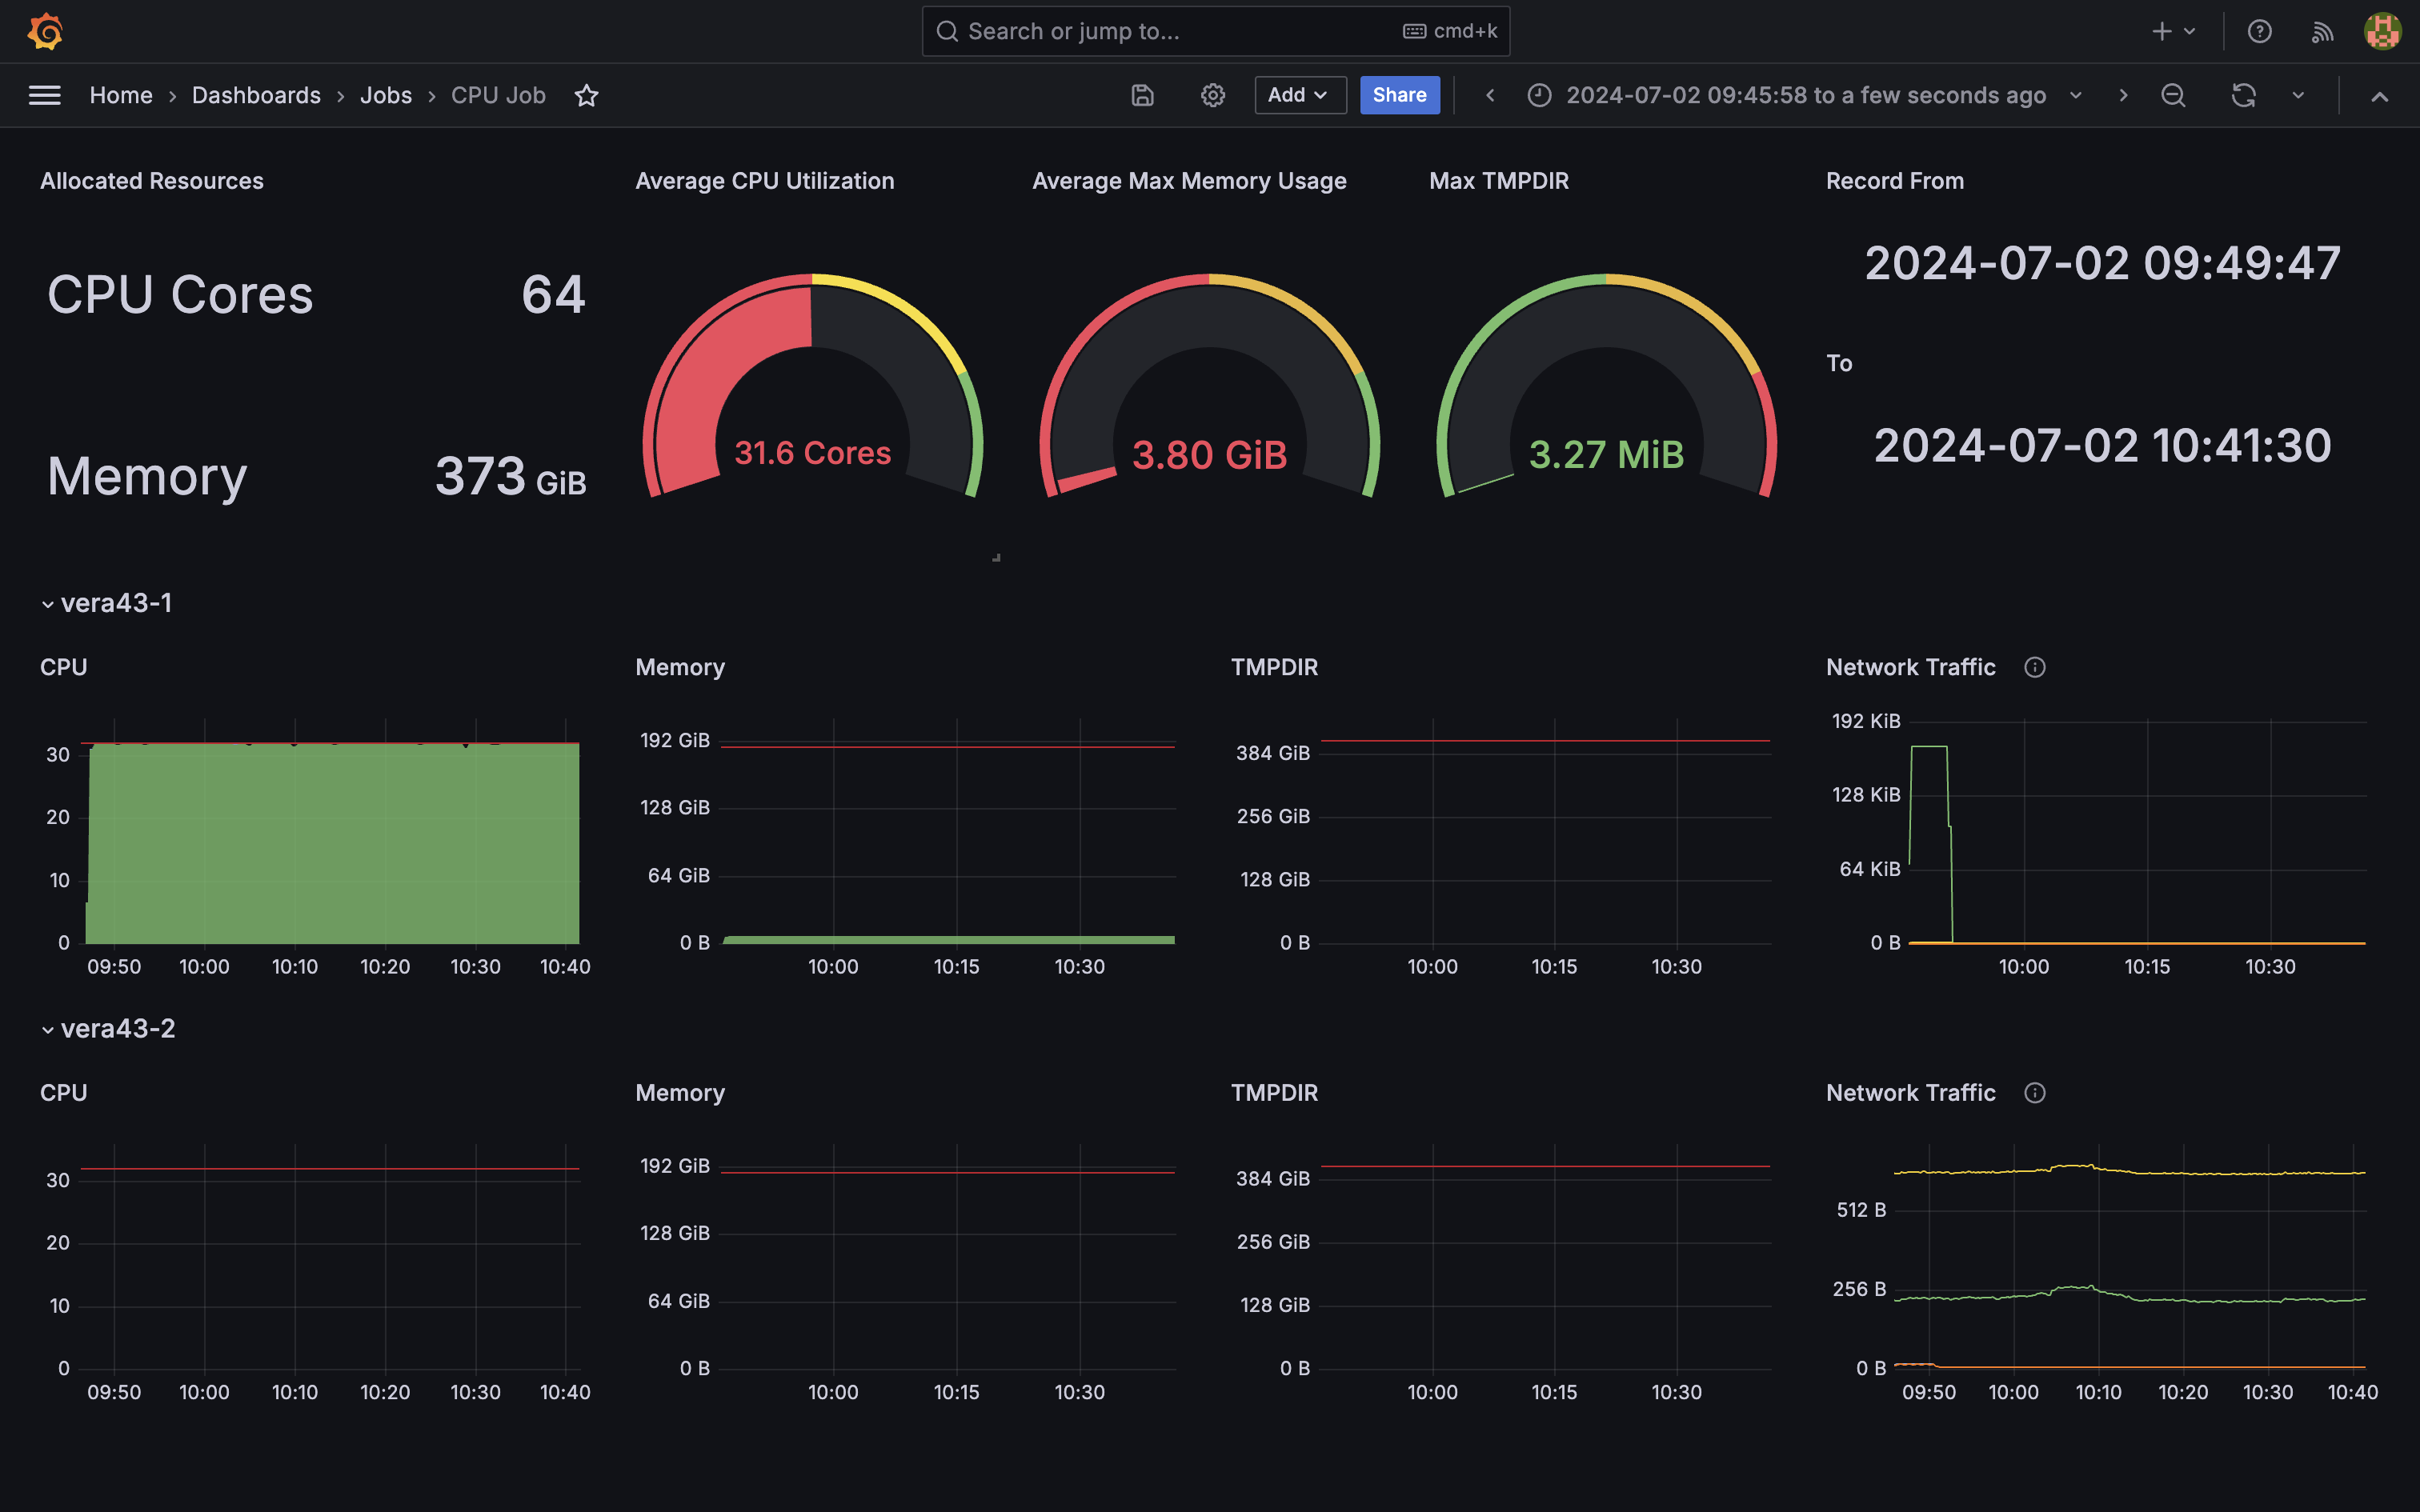
- Looks like something tried to use 2 nodes incorrectly.
- Requested 64 cores but only used half of them. One node was just idling.
Job monitoring
- Extremely inefficient I/O. All cores are waiting for each other finishing writing most of time (system cpu usage).
Profiling
- With the right tools you can easily dive into where your code bottlenecks are, we recommend:
- TensorFlow: TensorBoard
- PyTorch:
torch.profiler(possibly with TensorBoard) - Python: Scalene
- Compiled CPU or GPU code: NVIDIA Nsight Systems
- MATLAB: Built in profiler
- Tools can be used interactively on compute nodes with OpenOnDemand portals!
Things to keep in mind
- Never run (big or long) jobs on the login node! If you do, we will kill the processes. If you keep doing this, we will block your access temporarily. Prepare your job, do tests and check that everything’s OK before submitting the job, but don’t run the job there!
- The Open OnDemand portals allow interactive desktop and web apps directly on the compute nodes. Use this for heavy interactive work.
- If your home dir runs out of quota or you put to much experimental stuff in your
.bashrcfile, expect things like the desktop session to break. Many support tickets are answered by simply clearing these out. - Keep an eye on what’s going on - use normal Linux tools on the login node and on the allocated nodes to check CPU, memory and network usage, etc. Especially for new jobscripts/codes! Do check
job_stats.py! - Think about what you do - if you by mistake copy very large files back and forth you can slow the storage servers or network to a crawl
Getting support
- We ask all students to pass Introduction to computer clusters but all users who wishes can attend this online self learning course.
- Chalmers PhD students can also attend GTS course: Introduction to digital resources in research to have an overview of research tools and resources.
- Students should first speak to their supervisor for support
- We provide support to our users, but not for any and all problems
- We can help you with software installation issues, and recommend compiler flags etc. for optimal performance
- We can install software system-wide if there are many users who need it - but not for one user (unless the installation is simple)
- We don’t support your application software or help debugging your code/model or prepare your input files
Getting support
- Staff are available in our offices, to help with those things that are hard to put into a support request email (book a time in advance please)
- Origo building - Fysikgården 4, one floor up, ring the bell
- We also offer advanced support for things like performance optimisation, advanced help with software development tools or debuggers, workflow automation through scripting, etc.
Getting support - support requests
- If you run into trouble, first figure out what seems to go wrong. Use the following as a checklist:
- make sure you simply aren’t over disk quota with
C3SE_quota - something wrong with your job script or input file?
- does your simulation diverge?
- is there a bug in the program?
- any error messages? Look in your manuals, and use Google!
- check the node health: Did you over-allocate memory until Linux killed the program?
- Try to isolate the problem - does it go away if you run a smaller job? does it go away if you use your home directory instead of the local disk on the node?
- Try to create a test case - the smallest and simplest possible case that reproduces the problem
- make sure you simply aren’t over disk quota with
Getting support - error reports
- In order to help you, we need as much and as good information as possible:
- What’s the job-ID of the failing job?
- What working directory and what job-script?
- What software are you using?
- What’s happening - especially error messages?
- Did this work before, or has it never worked?
- Do you have a minimal example?
- No need to attach files; just point us to a directory on the system.
- Where are the files you’ve used - scripts, logs etc?
- Look at our Getting support page
In summary
- Our web page is https://www.c3se.chalmers.se
- Read up how to use the file system
- Read up on the module system and available software
- Learn a bit of Linux if you don’t already know it - no need to be a guru, but you should feel comfortable working in it
- Play around with the system, and ask us if you have questions
- Please use the SUPR support form - it provides additional automatic project and user information that we need. Please always prefer this to sending emails directly.
Outlook
- We have more GPUs, but are still often not utilized that much.
- Some retired nodes from Alvis might be integrated into Vera, but not decided yet.