SSH (shell access)
SSH access is meant for those who would like to use the command line interface on the clusters.
Important
See our general page on connecting for requirements before you can connect.
The conventional way to connect to clusters is using the Secure Shell (SSH) protocol. Every cluster have a one or more so called "login nodes" that is accessible from the internal network on Chalmers University of Technology, and follow the hostname convention:
If you are connected to the Chalmers local network you can login directly by running:
where you have to replace CID with your CID username and cluster with the
name of the cluster frontend you want to connect to, eg. vera1, vera2,
alvis1, alvis2.
Required software
Our systems all run some type of Unix environment and the main interaction with the systems is performed using a command-line interface (CLI). If you do not have any previous experience of a Unix command-line interface here are two guides that will get you up to speed: Introduction to Linux and GNU/Linux Command-Line Tools Summary.
To connect to the cluster and the aforementioned command-line interface you need a terminal (emulator) and an implementation of the Secure Shell (SSH) protocol. For Windows users with Windows 10 or later we recommend OpenSSH that ships with operating system. For older Windows versions we recommend the free program PuTTY that is a terminal emulator with SSH built in. Unix users (including Linux and Mac OS X) can use the terminal emulator and SSH that is shipped with the operating system.
Warning about post-quantum key exchange being used
The OpenSSH versions on Alvis and Vera do not have post-quantum safe cryptography as an option server side. This means that when/if a quantum computer is developed that is capable enough to be a "cryptographically-relevant quantum computer", it would be able to quickly break the used encryption.
If your version of OpenSSH is 10.1 or newer you will get a warning:
** WARNING: connection is not using a post-quantum key exchange algorithm.
** This session may be vulnerable to "store now, decrypt later" attacks.
** The server may need to be upgraded. See https://openssh.com/pq.html
However, this warning applies regardless of what version of OpenSSH you're using. This issue will be solved when both we and you update OpenSSH to version 9 or later. We will update when there is an official release for the OS we're running. You can read more at https://www.openssh.org/pq.html.
If you want to silence this warning you can add the following to you SSH config:
Setting up a hostname alias
Optionally, you can (on your local machine) set up alias by modifying the file
and add an entry e.g:
Host vera1
    HostName vera1.c3se.chalmers.se
    User your_cid

Host alvis1
    HostName alvis1.c3se.chalmers.se
    User your_cid

# etc.
This will allow you to conveniently scp/ssh to the cluster doing
ssh vera1            # This would now be equal to: ssh your_cid@vera1.c3se.chalmers.se
scp my_file vera2:   # This would now be equal to: scp my_file your_cid@vera2.c3se.chalmers.se:
In addition, you can enable SSH's ControlMaster option that keeps a single
persisten connection open for subsequent logins. This is required for those who
need to automate (frequent) logins is very convenient for other users:
Host alvis1
    HostName alvis1.c3se.chalmers.se
    User your_cid
    ControlMaster auto
    ControlPersist yes
    ControlPath ~/.ssh/ssh_mux_%L_%h_%r
With PuTTY on windows, you can tick the option box Share SSH connections if possible
Setting up ssh key
From MAC and Linux you can generate an SSH-key, upload it, and use this to log into the system, e.g:
This also works in Windows 10, if you have the OpenSSH client installed. If
not in the list under
Settings -> Apps -> Apps & features -> Optional features, it can be added from
that page ("Add a feature", only install the client), but the path to copy the
generated key will differ:
C:\Users\username>ssh-keygen -t rsa
C:\Users\username>scp .ssh\id_rsa.pub vera1:.ssh/authorized_keys
SSH is picky about the file permissions on both ends, else it will refuse to use the keys. You have to log into the cluster and modify using chmod:
The SSH-key can also be used by some other applications connecting to the cluster, such as Cyberduck. You can set up your computer to unlock the key by putting it in a keychain.
Creating and Using SSH-keys in PuTTY
- Install the latest version of PuTTY https://www.chiark.greenend.org.uk/~sgtatham/putty/latest.html.
- Open PuTTY Key Generator (PUTTYGEN.EXE)
- Click on the "Generate" button (or select "Generate key pair" from Key in the menu).
- Save the generated public and private keys (adding a passphrase will add some security if the computer (or key) is stolen, etc).
- Login to the server with your username / password by PuTTY.
- Copy the public key from the key generator, visible in the textbox ("Public
key for pasting [...]"), and paste it into the
~/.ssh/authorized_keysfile. - Save and close the file.
- Adjust the permissions of the
autorized_keysfile and .ssh folder (see instructions above) - Logout from the server.
- Open PuTTY (PUTTY.EXE) and enter the server name (under Host Name (or IP
address)).
- Username can be entered with the server address:
username@server.c3se.chalmers.se.
- Username can be entered with the server address:
- Go to Connection -> SSH -> Auth in the left-side menu, and select the newly created private key for authentication.
Using an alternative shell zsh or fish
Power users may prefer to launch an alternative command line shell. We provide
fish and zsh though the environment is not as well tested as the default
bash shell.
You can conveniently add this to your SSH configuration using a remote command, e.g:
You must also tell SSH to request a TTY as in the example above.
Use SSH tunnel to access services
Modern applications often provides web based graphical user interfaces and is meant to be accessed using a web browser. Due to security considerations many shared remote services on the Internet, in particular powerful HPC-systems, restrict access to only a few secure and trusted services, most commonly SSH (port 22). This becomes a problem for users wanting to access applications, such as Jupyter notebooks, that runs a web server behind a restrictive firewall or on compute nodes that are only on a local network. This brief guide aims to introduce SSH port forwarding which allows you to safely access many types of services running on a remote system using only the familiar SSH protocol and your normal CID credentials.
Linux, macOS and Windows 10 (with OpenSSH)
The command for creating a local tunnel is run on your own computer. The general form of the command is:
For example, to forward local port 8890 on your own computer to a Jupyter
notebook listening on default port 8888 on the login node for Alvis system
(alvis1.c3se.chalmers.se) we enter:
ssh -L 8890:localhost:8888 CID@alvis1.c3se.chalmers.se
ssh -L 8890:localhost:8888 alvis1 # if you have set up a hostname alias shown above
We do not have to forward the exact same local port number each time. In the
above example we could have chosen to forward -L 8080:localhost:8888 assuming
it was free. You can also forward multiple ports on the same line by appending
additional -L <local_port>:localhost<remote_port> options.
Windows (PuTTY)
There are many SSH clients available for Windows, if you have OpenSSL installed,
and/or are running Windows Subsystem for Linux (WSL), you might want to try if
the Linux and macOS instructions above works. You could also add a linux distro
from Microsoft Store, use the instructions above for Linux. Below we provide an
example port forwarding port 8890 to 8888 on Alvis using PuTTY.
- In the main Session view enter the name of the login node under "Host Name
(or IP address)". In this example we connect to
alvis1.c3se.chalmers.se. You can enter a name for the session under "Saved Session". Leave the rest as default.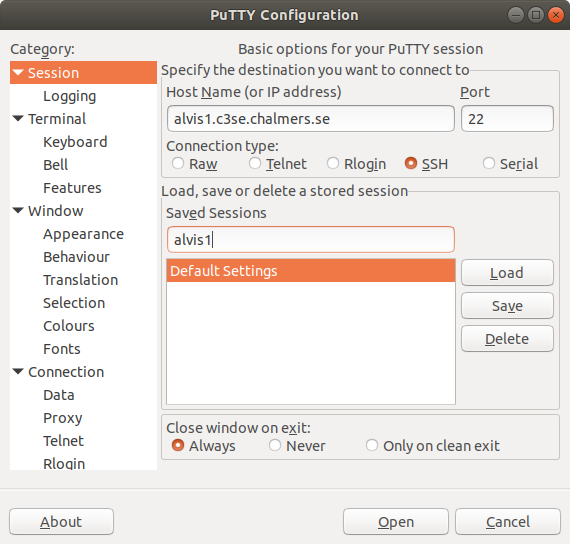 .
. - Move to Connection, SSH, Tunnels and in the "Add new forwarded port" section
we configure a tunnel from local ("Source port") port
8888to "Destination"alvis1.c3se.chalmers.se:8888. .
. - Move back to the main Sessions view and click "Save".
- Click Open in the bottom right corner to start the session.
Public keys of login nodes
These are the fingerprints of the public host keys of our login nodes. If the host key you see when you try to connect is different, abort the connection and contact us through https://supr.naiss.se/support/.
| Cluster | Algorithm | Fingerprint |
|---|---|---|
| Alvis | ECDSA | SHA256:xt8pNqCyCOaveKEXhKkq5KJ7k8H+TManiiF4ry3EmFE |
| Alvis | ED25519 | SHA256:GXaNJmWD2Jp9wFj03aH2zxsBIW9dhtiGjgJ2bHCzWhI |
| Alvis | RSA | SHA256:IywVhz/C4f/4Uq11b3Fwp5ptEhVDkV/e+xq/aRdtQag |
| Vera | ECDSA | SHA256:+eYjXM9zJZdduEPazeBYIhcpRJzof4jzUWr84TiTBIE |
| Vera | ED25519 | SHA256:Bmd4nMWUPrbZda3aLZ+t7mMdspDbL421/6cQBL510S0 |
| Vera | RSA | SHA256:VSJhCr/z5VvrSWCVwJpoR6+igQ2VVVS60Afqs6LlPIc |